I've had a pihole on my home network for years. I set it up on a pi3b natively and it ticked along doing its thing, until it didn't. The sd card wore out and became read-only. It took me a while to discover that that was the issue, as it still worked, but you couldn't make any changes. Well, you could - everything seemed to work, but nothing was actually being written. Fortunately I had a teleporter backup of the pihole. I quickly spun up a vm with a pihole docker instance and loaded the data from backup. I then pointed all the machines at the new IP 1. In the mean time, I ordered m2 sata SSDs and USB enclosures, and worked out how to get my two raspberry pi's to boot off a USB attached SSD.2
When I re-setup the pi on the new SSD, I decided that the convenience and ease of the docker setup was ideal. I ran both instances of pihole but kept them separate initially. I eventually found a script to sync the piholes via git. At a later date, I found gravity-sync, which is just brilliant.
I configured all my hosts to use the pi as primary dns, and the pihole vm as secondary. This worked brilliantly until a few months later, I noticed a weird issue where internet access seemed a bit slow. It took a short while to open up an initial connection to a site, but after that things were fine. Investigating, I discovered the pi wasn't responding to ping. The SSD had died. I RMA'd the SSD and ordered a replacement. They're fairly cheap and the RMA process will take a while. In the mean time, I configured everything in the network to point to the pihole vm as primary.
While waiting for the new SSD to arrive, I was thinking about load balancing. Previously, the pi was answering queries from most of the user devices, while the vm was answering queries mostly for my internal servers/services. NGINX could do the load balancing and I was already using a few instances for various things, and I am also using Nginx Proxy Manager to handle just about everything. I figured I could probably use it to do the balancing as well.
You can't use Nginx Proxy Manager to do load balancing. Yet3. Their interface doesn't allow for it.4
I set up a new nginx docker instance using the official alpine slim container, as I'm only going to use it for load balancing, I don't need bells and whistles. The image is ~11mb.
I created a file called stream.conf
and included it in nginx.conf
.
stream.conf
:
stream {
upstream dns_servers {
random;
server 192.168.0.2:53;
server 192.168.0.3:53;
}
server {
listen 53;
proxy_pass dns_servers;
}
server {
listen 53 udp;
proxy_pass dns_servers;
}
}
I also made sure to pass port 53 tcp & udp to docker.
I've now configured the load balancer as primary...
]]>My current hobby is 3D printing. I've spent quite a bit of time and money upgrading my printer and getting it working well. My latest foray was to convert it to use Klipper via running Mainsail on one of my raspberry pi computers. I discovered that the Moonraker API can control smart plugs, so you can do things like remotely power on your printer and other devices. I bought two cheap wifi smart plugs from Amazon that turned out to be Tuya/Smart Life based - which Moonraker doesn't support. Boo.
Moonraker does provide a generic http plugin interface for controlling smart devices, so Moonraker Tuya Generic HTTP Server was born!
Photo by Markus Spiske on Unsplash
]]>I had a Pi4B 8Gb running Home Assistant OS on an m1 sata SSD in a USB enclosure, which I had no issues with whatsoever, however all my intentions for Home Assistant haven't materialized, so I figured I'd get more use out of it if I switched to running Klipper on it. Ultimately I decided on using Mainsail via their MainSailOS raspberry pi image.
Considering that the Home Assistant OS installation on the SSD was easy enough via Raspberry Pi Imager when I decided to convert from using an SD Card to using an SSD, and since Mainsail OS is available via RPI Imager, I figured it would be easy to just write the image to the SSD and off I go.
It was not to be. 2
After allowing some time for the system to boot and resize the partition, I was still unable to ping the device's IP (set via static DHCP). I connected a screen and keyboard to the pi and restarted it (as it was headless it had not initialized the display). The system started booting, then complained about disk corruption. It also threw a kernel panic. Some boots it would attempt to do the partition resizing but then complain of missing partitions. But it usually ended up with a kernel panic.
I connected the SSD to my desktop, cleared the partitions, created a windows partition then ran a surface scan on it to rule out any issues with the device. It passed with zero issues. I cleared the partitions again and re-wrote the image. The pi booted and had the same issue. I tried the 32bit version of the image with the same result. I then tried the raspberry pi OS lite image. Same issues again.
I wrote the Mainsail OS image to an SD Card, and successfully booted off that. I thought that if it was having an issue booting off the SSD for whatever reason, I could allow the SD Card to boot, the manually copy the data across to the SSD and then try booting it again. After successfully booting off the SD Card, I shutdown the system, put the SD Card in to a USB reader, and connected it and the SSD to another linux box. I successfully copied the data to the SSD, adjusted the UUIDs and tried to boot the pi with the SSD. I got a lot further this time, but still had issues.
I tried re-copying the SD Card to the SSD using rpi-clone however it failed very soon in to the operation saying that the device had disappeared. Syslog message indicated tha the XHCI USB device had disconnected.
After some googling, I determined that the current pi kernel has an issue with certain USB devices and the uas (USB Attached SCSI Mass Storage) driver. It seems it hates the JMicron controller that the USB enclosure uses. The fix...
]]>1) In the Settings app, scroll down to the particular app settings and check that it has local lan access.
2) Forget your home wifi network so that iOS/iPadOS stops trying to connect to it when it doesn't detect internet access on the drone wifi.
3) Disable Mobile Data. Even if you're connected to the drone wifi and getting an IP address - if Mobile Data is connected, the software will not be able to connect to the drone.
Now it should work. Good luck.
]]>You can still enable auto-power on via command line on the host [https://support.citrix.com/article/CTX133910], however this just batch starts all VMs at once. You might like a bit more control, particularly if you require the VMs to start up in a particular order.
The method I'm about to explain may not be particularly elegant, but it works for my home lab.
Establish a shell connection to your XenServer / XCP-NG host via SSH or directly on the console. Using PuTTY or some other SSH client that allows you to copy and paste will be really helpful.
You should be in the root user's home directory /root. This should be the default directory you're dropped in to when you first establish your connection
Create a new file called vm-autostart.sh with your favourite editor. I like vi as it's usually available.
Paste the following contents and modify the array called vms to suit:
#!/bin/bash
# xe vm-list for name-label, add in start order
vms=("VM1" "VM2" "VM3" "VM4" "VM5" "VM6" "VM7" "VM8" "VM9" "VM10")
wait=42s
# No need to modify below
initwait=2.5m
vmslength=${#vms[@]}
log=/root/vma.log
start_vm () {
echo -n "[$(date +"%T")] Starting $1 ... " >> ${log}
/opt/xensource/bin/xe vm-start name-label=$1
if [ $? -eq 0 ]
then
echo "Success" >> ${log}
else
echo "FAILED" >> ${log}
fi
# Wait if not the last vm
if [ "$1" != "${vms[${vmslength}-1]}" ]
then
echo "Waiting ${wait}" >> ${log}
sleep ${wait}
fi
}
echo "[$(date +"%T")] Running autostart script (Waiting ${initwait})" > ${log}
sleep ${initwait}
for vm in ${vms[@]}
do
start_vm ${vm}
done
echo "[$(date +"%T")] Startup complete." >> ${log}
The vms array takes the list of VM name-label properties. You can see them on the host if you run xe vm-list, or just take a look at your management software for the VM name. If you prefer to use the UUID, just modify the script accordingly.
The wait variable is set at 42 seconds. This is just slightly longer than it takes each of my vms to start up. You may require a bit longer, or you can set it a bit shorter. As my VMs all boot from the hosts local disks, I have the delay set so that there isn't so much contention for disk access. If you're booting from a storage array, then you might not require such a long delay.
The initwait variable is set at 2.5 minutes. This is to allow time for the toolstack to finish starting before trying to start the first VM. If the toolstack hasn't properly started before the first VM attempts to boot, the virtual machine will fail to start and you will have to start it manually. Subsequent machines will usually start, depending on the wait variable.
Save the script and quit the editor when you're happy with it. Remember to...
]]>sudo apt-get install dkms build-essential linux-headers-`uname -r`
I discovered that if you clone an ubuntu server based image, networking stops functioning in the clone. The reason for this is that the new Machine assigns a new MAC address to the NIC. So the Udev rules think it's a new card, and assign it a new device id, like eth1, or eth2, etc.
To prevent this from happening, in your base image, edit
/lib/udev/rules.d/75-persistent-net-generator.rules
Search for 'xen', and you'll see a block about ignoring the Xen virtual interfaces. Add the following below it:
# ignore VirtualBox virtual interfaces
ATTR{address}=="08:00:27:*", GOTO="persistent_net_generator_end"
Save it, and then remove the file /etc/udev/rules.d/70-persistent-net.rules
.
Do the same thing in any cloned images with broken networking, and reboot the VMs.
]]>It's fairly simple to fix. First, you should probably remove all the unnecessary crap that you never use. There's a bunch of utilities out there that can help you with this.
Defrag your drive using your favourite defragger.
Now you will need one of two possible utilities (There may be more, but these are the ones I'm aware of):
Precompact.iso is MUCH easier to use. All you need to do is mount the ISO inside your VM, and it will prepare your disk for compaction.
SDelete is only marginally more difficult. Run it in a command prompt like so:
SDelete -c C:
(or use whatever drive letter you want to compact). SDelete will write zeroes to
the free space on your drive image. This allows compaction to take place
properly. Note – this is exactly what the Precompact.iso does, just without the
fancy Windows GUI progress bar.
As soon as Precompact or SDelete is finished, shut down the VM.
Open command prompt on your host machine, and navigate to the folder where your hard disk images are located.
NOTE: It's probably MUCH easier to have the path to Virtual Box set in your PATH statement, otherwise you have to specify the full path to VBoxManage every time you use it.
In the command prompt, run:
[path to virtualbox]\VBoxManage modifyhd "Name Of Image.vdi" --compact
Your disk image will now be compacted, and should end up quite a bit smaller than it was. If you get an error about the disk image not being found blah blah, specify the FULL path to the image, like so:
[path to virtualbox]\VBoxManage modifyhd "C:\Users\Username\.VirtualBox\HardDisks\Name of Image.vdi" --compact
A possible solution to this dilemma would be to simply add a new disk to the machine, as needed. However, I like making things difficult for myself, so I rather wanted to resize the initial disk. Unfortunately this is not possible with the provided VBoxManage utility. So, you need to jump through a few hoops, but it's really not that difficult.
You will need:
Download the ISO versions – and for Clonezilla – DO NOT download the "Alternate" version, it will NOT work.
Using the Virtual Media Manager, create a new dynamic disk of your desired larger size. Call it whatever you like. While you are there, add the CloneZilla and GParted iso's to the CD/DVD library. Create a new VM, but do not attach any disks to it. Configure it as Linux, Debian. I called mine Clone Master.
Edit the VM settings, go to the Storage node, and add a new hard disk. Select your SOURCE disk (The disk you want to enlarge). Add another hard disk, and select the DESTINATION disk (the big image you just created). Click the CD node, and select the clonezilla image. Boot the new VM.
The CloneZilla CD should now boot (If it doesn't, check the boot priority in your VM settings, and make sure CD is set to boot first).
Use the utility to do a local disk to disk clone. Using "beginner" mode is fine. The "expert" mode has a setting to extend the partition to the size of the destination disk, but it didn't work for me at all – the cloned partition was the original size. Not sure if it's because of the NTFS partitions, or a bug in the version I was using. If it works for you then EXCELLENT – you won't need to do the GParted segment.
Once you have cloned the disk, power off the cloning VM, edit the settings, and detach the hard disks from it. Attach the newly cloned bigger image to your original VM, or create a new VM for it, and boot it. Check that the system works ok. If the partition hasn't grown to fill the new partition, you will need to continue to the next step.
Shut down the VM with the new large image. Edit the settings of your cloning VM, set the CD to use the GParted iso, and attach the newly cloned image to the machine. Boot the machine, and GParted should load. Just accept default settings, and eventually X-Windows will load with a copy of GParted. Click the extend...
]]>For those of you who are using an ADSL modem or any kind of router behind an IPCop, it can sometimes become an annoying process to access the router’s web gui so that you can view connection statistics, etc. Usually you need to unplug the router and then hook it up directly to your local LAN, etc. Whatever you need to do, it can be annoying.
I have come up with a way around that. It just involves using some nifty tricks via SSH, and I will show you how to configure your system with minimal fuss in order to get to your router’s web gui. It’s easy to modify so you can access any other port too.
You will need:
Firstly, you need to enable one or two options in your IPCop’s web gui. Access the IPCop web gui using your browser, and select System -> SSH Access.
Login when prompted using your admin user.
If you haven’t already, enable ‘SSH Access’, and in particular, enable ‘Allow TCP Forwarding’. You should have at least ‘Allow password based authentication’ as well.
Note that you access SSH on port 222.
Save the settings, and you can close your session.
If you’re not using an IPCop, just ensure that you can access your firewall via ssh.
Now comes the “hard” part (which is actually pretty easy as you will see).
Extract the putty archive somewhere useful, and create a shortcut to the putty.exe somewhere convenient. I usually create the shortcut on my Quick Launch toolbar. Or you can just run the exe directly. It’s entirely up to you. I’m not going to tell you how to manage your software. 😉
Run putty, and you will be presented with a confusing interface. The basic idea is that you type in the IP or hostname of the machine you want to connect to, select the type of connection, and hit enter, which launches the connection.
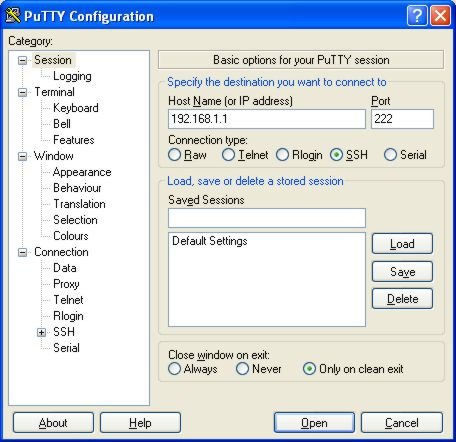
In our case, we are going to be creating a couple of saved sessions, so that all we will need to do is to double click the entry in the saved sessions list, and the connection will be established, or the command will be executed.
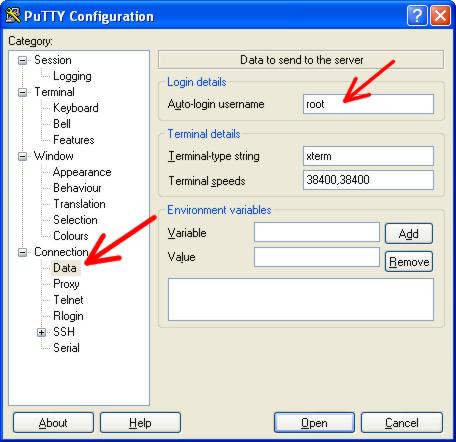
Now since we will ALWAYS be logging in to the firewall as user ‘root’, we can set the username so that we don’t always have to type it. This step is optional.
In the category list, expand ‘Connection’, and select ‘Data’. In the very top field, under ‘Auto-login username’ enter ‘root’ (without the quotes).
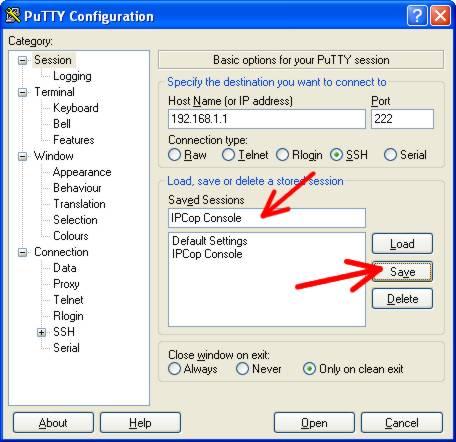
Select ‘Session’ at the top of the category list to return to the session configuration page.In the ‘Saved Sessions’ field, give your session a name. Use ‘IPCop Console’ if it will make you feel better, and then click the ‘Save’ button. You now have a saved session.
Since the session is already technically loaded, we can click the ‘Open’ button at the bottom of the window to launch the session, or you...
]]>