Home
For those of you who are using an ADSL modem or any kind of router behind an IPCop, it can sometimes become an annoying process to access the router’s web gui so that you can view connection statistics, etc. Usually you need to unplug the router and then hook it up directly to your local LAN, etc. Whatever you need to do, it can be annoying.
I have come up with a way around that. It just involves using some nifty tricks via SSH, and I will show you how to configure your system with minimal fuss in order to get to your router’s web gui. It’s easy to modify so you can access any other port too.
You will need:
- A copy of PuTTY [http://www.chiark.greenend.org.uk/~sgtatham/putty/]
- A Web Browser
Firstly, you need to enable one or two options in your IPCop’s web gui. Access the IPCop web gui using your browser, and select System -> SSH Access.
Login when prompted using your admin user.
If you haven’t already, enable ‘SSH Access’, and in particular, enable ‘Allow TCP Forwarding’. You should have at least ‘Allow password based authentication’ as well.
Note that you access SSH on port 222.
Save the settings, and you can close your session.
If you’re not using an IPCop, just ensure that you can access your firewall via ssh.
Now comes the “hard” part (which is actually pretty easy as you will see).
Extract the putty archive somewhere useful, and create a shortcut to the putty.exe somewhere convenient. I usually create the shortcut on my Quick Launch toolbar. Or you can just run the exe directly. It’s entirely up to you. I’m not going to tell you how to manage your software. 😉
Run putty, and you will be presented with a confusing interface. The basic idea
is that you type in the IP or hostname of the machine you want to connect to,
select the type of connection, and hit enter, which launches the connection.
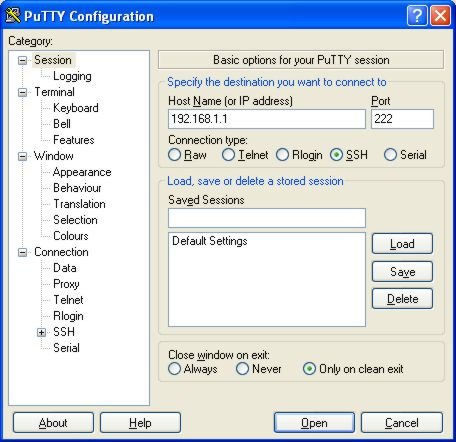
In our case, we are going to be creating a couple of saved sessions, so that all we will need to do is to double click the entry in the saved sessions list, and the connection will be established, or the command will be executed.
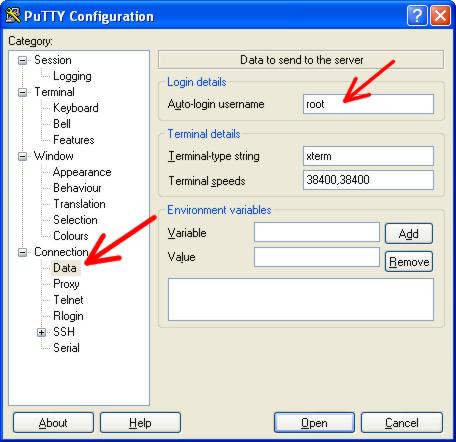
Now since we will ALWAYS be logging in to the firewall as user ‘root’, we can set the username so that we don’t always have to type it. This step is optional.
In the category list, expand ‘Connection’, and select ‘Data’. In the very top
field, under ‘Auto-login username’ enter ‘root’ (without the quotes).
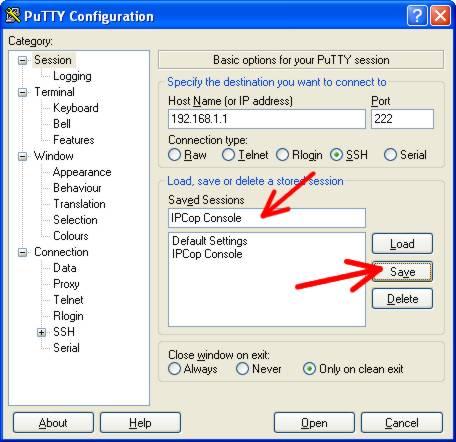
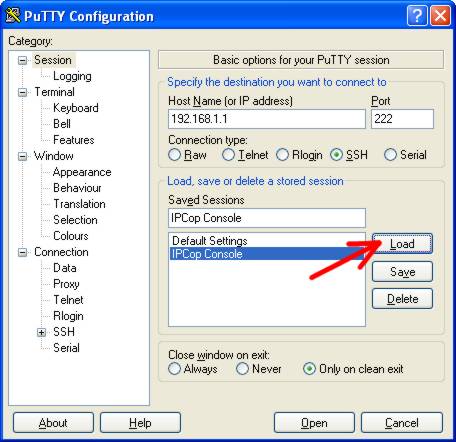
Select ‘Session’ at the top of the category list to return to the session
configuration page.In the ‘Saved Sessions’ field, give your session a name. Use
‘IPCop Console’ if it will make you feel better, and then click the ‘Save’
button. You now have a saved session.
Since the session is already technically loaded, we can click the ‘Open’ button at the bottom of the window to launch the session, or you can simply double click the new ‘IPCop Console’ saved session to launch it.
Using username "root". root@ipcop's password:Since we set the ‘auto login’ feature, the username will automatically be entered for us, and you will just be prompted for the password. Enter the IPCop root password, and you should be presented with a colourful prompt.
Using username "root".
root@ipcop's password:
Last login: Sun Apr 13 13:10:13 2008 from blah
root@ipcop:~ #
This is good enough for our purposes, so just press CTRL+D to quit the session. ‘logout’ or ‘exit’ will work just as well.
When using IPCop to establish the pppoe sessions for us, it sets the RED interface to an IP address of 1.1.1.1, which is not very helpful for us if we want to talk to a modem/router using an IP address of say 192.168.1.254 (Billion default). Therefore what we need to do is to add an ip address of the same network that your router uses to the IPCop RED interface.
NOTE: If you are using a different modem/router brand, simply adjust the subnets / addresses as necessary.
Since the router is by default using 192.168.1.254, we can configure the IPCop using ANY other address on the same subnet (since we know that there isn’t anything else using that subnet on our RED interface anyway). For simplicity’s sake, I will use 192.168.1.1 for the RED interface.
We are now going to create another session in putty to add the IP address 192.168.1.1 to the red interface for us automatically.
Start up putty again. Select the IPCop Console session, and press the LOAD
button. NOTE – we do NOT want to establish a session at this time.
The settings for the IPCop Console connection will now be loaded in to putty. In the category list, expand ‘Connection’, and then select ‘SSH’. At the top of the page, you will see a field ‘Remote command’. This is where we will add the command that putty will execute for us.Type the text below in to the ‘Remote command’ field. Change 192.168.1.1 to whatever address you would need to use to talk to your brand of modem/router.
/sbin/ip addr add 192.168.1.1/24 dev eth1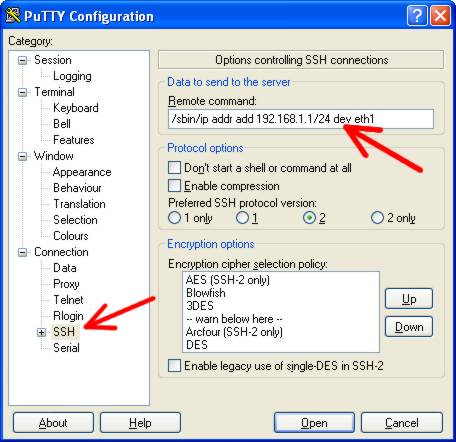
In the category list, click ‘Session’ at the top.
Now, under ‘Saved Sessions’, change the name of the session to something else.
In my case, I used ‘ADSL Router Access Start’. Below the ‘Saved Sessions’ field,
you will see an option ‘Close window on exit’. Set the option ‘only on clean
exit’ and then click the SAVE button. 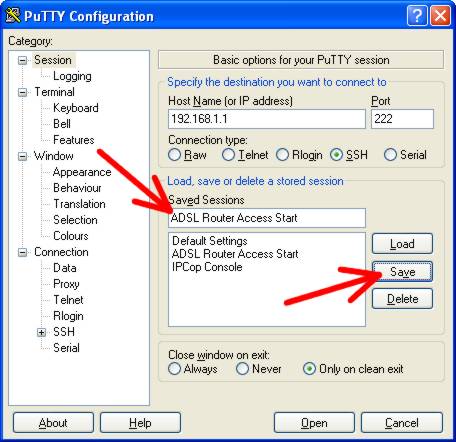
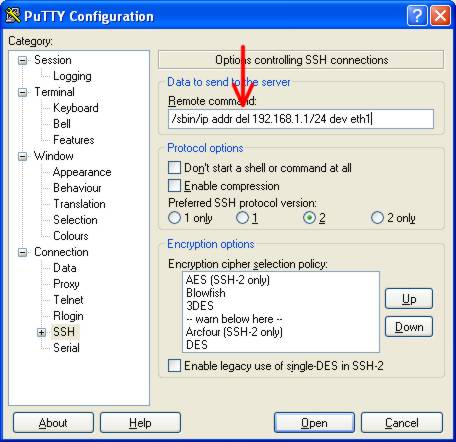
In the category list, select ‘Connections -> SSH’ again. In the remote command
field, change the word ‘add’ to ‘del’ so that the remote command looks like
this: /sbin/ip addr del 192.168.1.1/24 dev eth1
In the category list, click ‘Session’ at the top again, and change the field under ‘Saved Sessions’ to something else. I used ‘ADSL Router Access Stop’ and click the SAVE button.
Now you should have three sessions in your session list: IPCop Console, ADSL Router Access Start, and ADSL Router Access Stop.
We have one more session to create.
In the Saved Sessions list, select IPCop Console, and press the LOAD button.
In the category list at the left, select ‘Connection -> SSH’ again. This time we leave ‘Remote command’ blank, but now we need to set the option ‘Don’t start a shell or command at all’. Once you have selected that, in the category list, expand the ‘SSH’ node that is currently highlighted, and then select ‘Tunnels’.
We’re only concerned with the options near the bottom, Source Port, Destination,
etc.Enter a source port. This can be anything you like (up to 65535) – AS LONG
AS IT IS NOT IN USE ON YOUR COMPUTER.
If you want to see what ports are currently in use on your computer, open a
command prompt, and type netstat -an. You’re concerned with the column called
‘Local Address’, which will have a whole bunch of entries like 127.0.0.1:137 or
0.0.0.0:500, with various other addresses on your machine. The part that you’re
concerned with is the bit after the “:” – so x.x.x.x:400 <– that is the port. If
the port you want to use is listed here, you will need to choose something else
– as long as it doesn’t appear on that list. NOTE – on Vista you might need to
run the command prompt as an Administrator (Right click the shortcut).
In my case, I just used the port 12345. Enter the destination. This will be the modem/router IP address, and the web port. So I used 192.168.1.254:80(Port 80 is the port that web servers listen on).
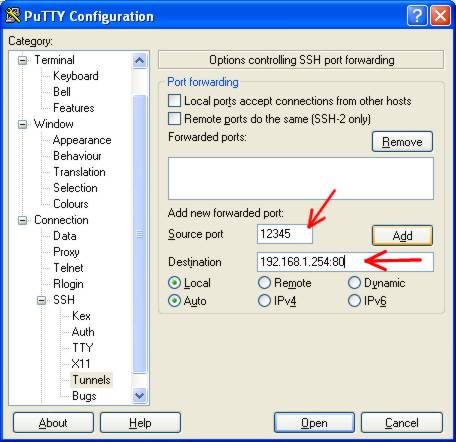
Click ‘ADD’.
In the box above that section (called Forwarded Ports), you will now see an entry:
L12345 192.168.1.254:80
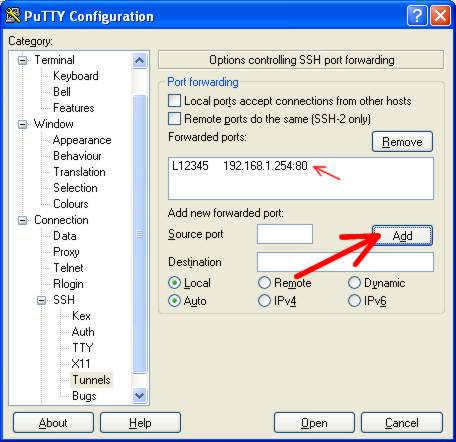
In the category list, click ‘Session’, and under ‘Saved Sessions’, give the session a new name. I used ‘ADSL Router Port Forward’ and click SAVE.
Congratulations. The configuration is now complete.
How to use it: Start Putty. Double click the ‘ADSL Router Access Start’ session. Enter the password. Almost immediately, the putty window will close. THIS IS NORMAL. All putty did was tell the IPCop to add the IP Address of 192.168.1.1 to the RED interface so that we can access the router.
If you run this command more than once, nothing bad will happen, so if you’re not sure if you ran it, you can safely launch it again.
Start Putty again. This time, double click the ‘ADSL Router Port Forward’. Enter the password, and then nothing much will happen. You will not get a command prompt, nor will anything further appear on the screen. DO NOT CLOSE THE WINDOW. Just minimize it to get it out the way.
Now open up your web browser, and enter the url: http://localhost:12345. You
should be prompted to enter your modem/router password. Congratulations, you are
now accessing the configuration pages for your modem/router.
When you are finished with the modem configuration, you can close the putty window that you opened previously. This will terminate the tunnel through your IPCop to your modem, and accessing localhost on port 12345 will no longer work.
While not entirely necessary, you can start putty, and launch the ‘ADSL Router Access Stop’ session, which will remove the 192.168.1.1 ip address off the RED interface.
View all of Access your router behind your Linux firewall
I just got home from the hospital where I booked my wife in… to the maternity ward. Our third child, another daughter, will be born tomorrow via C/Section.
It’s quite amazing. Every flippin’ time they put her in the same ward, in the same bed. :p I guess it means everything will be just fine 🙂
It’s been 5 years now since our last child. Everything is scary again in that ‘Oh boy, here we go again’ kind of fashion, but at least we know what we’re doing. Well, I hope we know what we’re doing. :p
View all of It's happening again