Home
You've been messing about in your VM, installing and removing software, etc. Your disk space usage inside your machine says you've only used 3Gb of disk space, yet your actual image is much bigger. How do you fix it?
It's fairly simple to fix. First, you should probably remove all the unnecessary crap that you never use. There's a bunch of utilities out there that can help you with this.
Defrag your drive using your favourite defragger.
Now you will need one of two possible utilities (There may be more, but these are the ones I'm aware of):
- SDelete from http://www.sysinternals.com – this is a tiny 47kb executable.
- Precompact.iso – Obtained from Microsoft Virtual Server installation (May be available in other MS VM products)
Precompact.iso is MUCH easier to use. All you need to do is mount the ISO inside your VM, and it will prepare your disk for compaction.
SDelete is only marginally more difficult. Run it in a command prompt like so:
SDelete -c C:
(or use whatever drive letter you want to compact). SDelete will write zeroes to
the free space on your drive image. This allows compaction to take place
properly. Note – this is exactly what the Precompact.iso does, just without the
fancy Windows GUI progress bar.
As soon as Precompact or SDelete is finished, shut down the VM.
Open command prompt on your host machine, and navigate to the folder where your hard disk images are located.
NOTE: It's probably MUCH easier to have the path to Virtual Box set in your PATH statement, otherwise you have to specify the full path to VBoxManage every time you use it.
In the command prompt, run:
[path to virtualbox]\VBoxManage modifyhd "Name Of Image.vdi" --compact
Your disk image will now be compacted, and should end up quite a bit smaller than it was. If you get an error about the disk image not being found blah blah, specify the FULL path to the image, like so:
[path to virtualbox]\VBoxManage modifyhd "C:\Users\Username\.VirtualBox\HardDisks\Name of Image.vdi" --compact
View all of Virtual Box - Compacting Images
Like a tool, and not thinking ahead, I created an XP Base dynamic image of max 10gb in size. While this is usually enough space to mess around with things, I find it can be a pain in the backside when you want to install a sizeable program – say Visual Studio. While possible, you end up with very little disk space left over at the end of the day.
A possible solution to this dilemma would be to simply add a new disk to the machine, as needed. However, I like making things difficult for myself, so I rather wanted to resize the initial disk. Unfortunately this is not possible with the provided VBoxManage utility. So, you need to jump through a few hoops, but it's really not that difficult.
You will need:
- Clonezilla – http://clonezilla.org
- GParted – http://sourceforge.net/projects/gparted/
Download the ISO versions – and for Clonezilla – DO NOT download the "Alternate" version, it will NOT work.
Using the Virtual Media Manager, create a new dynamic disk of your desired larger size. Call it whatever you like. While you are there, add the CloneZilla and GParted iso's to the CD/DVD library. Create a new VM, but do not attach any disks to it. Configure it as Linux, Debian. I called mine Clone Master.
Edit the VM settings, go to the Storage node, and add a new hard disk. Select your SOURCE disk (The disk you want to enlarge). Add another hard disk, and select the DESTINATION disk (the big image you just created). Click the CD node, and select the clonezilla image. Boot the new VM.
The CloneZilla CD should now boot (If it doesn't, check the boot priority in your VM settings, and make sure CD is set to boot first).
Use the utility to do a local disk to disk clone. Using "beginner" mode is fine. The "expert" mode has a setting to extend the partition to the size of the destination disk, but it didn't work for me at all – the cloned partition was the original size. Not sure if it's because of the NTFS partitions, or a bug in the version I was using. If it works for you then EXCELLENT – you won't need to do the GParted segment.
Once you have cloned the disk, power off the cloning VM, edit the settings, and detach the hard disks from it. Attach the newly cloned bigger image to your original VM, or create a new VM for it, and boot it. Check that the system works ok. If the partition hasn't grown to fill the new partition, you will need to continue to the next step.
Shut down the VM with the new large image. Edit the settings of your cloning VM, set the CD to use the GParted iso, and attach the newly cloned image to the machine. Boot the machine, and GParted should load. Just accept default settings, and eventually X-Windows will load with a copy of GParted. Click the extend button, and increase the partition to fill the disk. Apply the changes. It will only take a few seconds to completed. Exit the system, and shut down the VM. Edit the VM settings, and detach the disks (It's not strictly necessary – more of a safety measure).
Boot your previous VM to test the disk. All should be good.
View all of Virtual Box - Resizing Disk Images
For those of you who are using an ADSL modem or any kind of router behind an IPCop, it can sometimes become an annoying process to access the router’s web gui so that you can view connection statistics, etc. Usually you need to unplug the router and then hook it up directly to your local LAN, etc. Whatever you need to do, it can be annoying.
I have come up with a way around that. It just involves using some nifty tricks via SSH, and I will show you how to configure your system with minimal fuss in order to get to your router’s web gui. It’s easy to modify so you can access any other port too.
You will need:
- A copy of PuTTY [http://www.chiark.greenend.org.uk/~sgtatham/putty/]
- A Web Browser
Firstly, you need to enable one or two options in your IPCop’s web gui. Access the IPCop web gui using your browser, and select System -> SSH Access.
Login when prompted using your admin user.
If you haven’t already, enable ‘SSH Access’, and in particular, enable ‘Allow TCP Forwarding’. You should have at least ‘Allow password based authentication’ as well.
Note that you access SSH on port 222.
Save the settings, and you can close your session.
If you’re not using an IPCop, just ensure that you can access your firewall via ssh.
Now comes the “hard” part (which is actually pretty easy as you will see).
Extract the putty archive somewhere useful, and create a shortcut to the putty.exe somewhere convenient. I usually create the shortcut on my Quick Launch toolbar. Or you can just run the exe directly. It’s entirely up to you. I’m not going to tell you how to manage your software. 😉
Run putty, and you will be presented with a confusing interface. The basic idea
is that you type in the IP or hostname of the machine you want to connect to,
select the type of connection, and hit enter, which launches the connection.
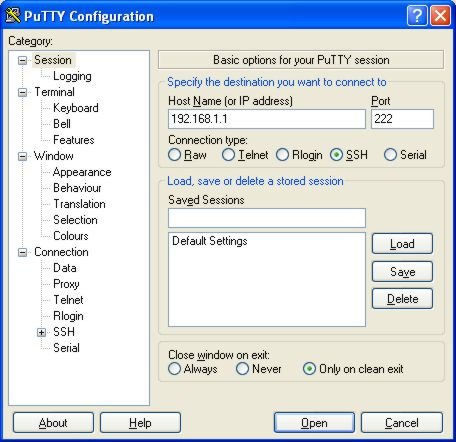
In our case, we are going to be creating a couple of saved sessions, so that all we will need to do is to double click the entry in the saved sessions list, and the connection will be established, or the command will be executed.
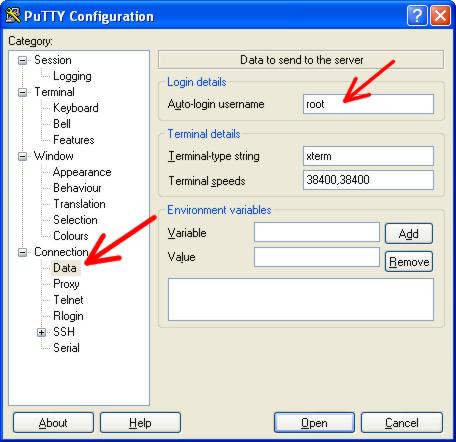
Now since we will ALWAYS be logging in to the firewall as user ‘root’, we can set the username so that we don’t always have to type it. This step is optional.
In the category list, expand ‘Connection’, and select ‘Data’. In the very top
field, under ‘Auto-login username’ enter ‘root’ (without the quotes).
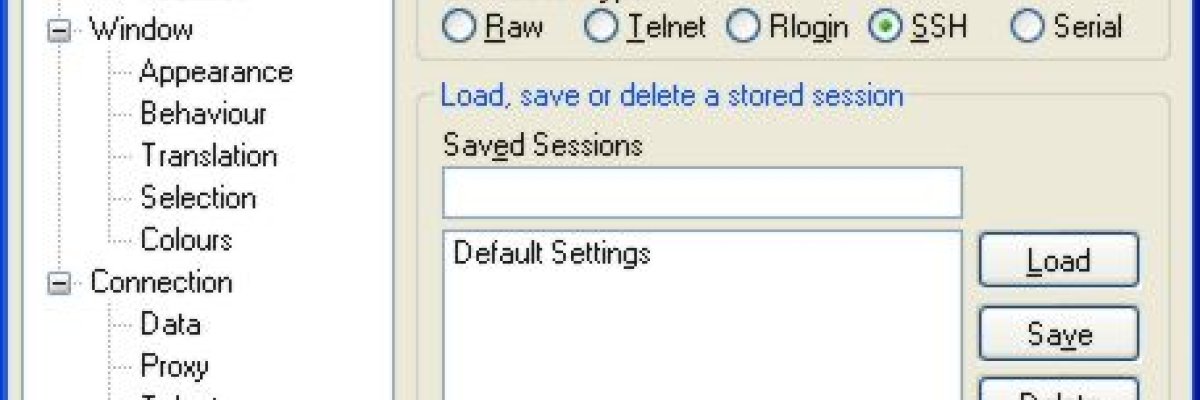
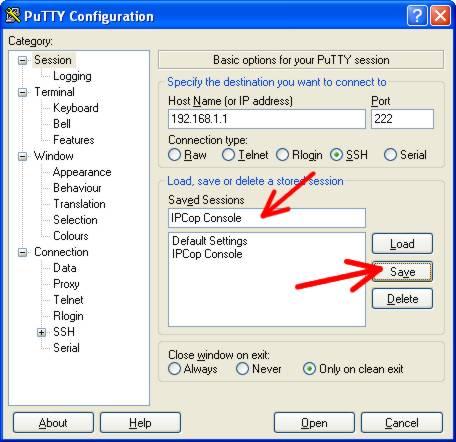
Select ‘Session’ at the top of the category list to return to the session
configuration page.In the ‘Saved Sessions’ field, give your session a name. Use
‘IPCop Console’ if it will make you feel better, and then click the ‘Save’
button. You now have a saved session.
Since the session is already technically loaded, we can click the ‘Open’ button at the bottom of the window to launch the session, or you can simply double click the new ‘IPCop Console’ saved session to launch it.
Using username "root". root@ipcop's password:Since we set the ‘auto login’ feature, the username will automatically be entered for us, and you will just be prompted for the password. Enter the IPCop root password, and you should be presented with a colourful prompt.
Using username "root".
root@ipcop's password:
Last login: Sun Apr 13 13:10:13 2008 from blah
root@ipcop:~ #
This is good enough for our purposes, so just press CTRL+D to quit the session. ‘logout’ or ‘exit’ will work just as well.
When using IPCop to establish the pppoe sessions for us, it sets the RED interface to an IP address of 1.1.1.1, which is not very helpful for us if we want to talk to a modem/router using an IP address of say 192.168.1.254 (Billion default). Therefore what we need to do is to add an ip address of the same network that your router uses to the IPCop RED interface.
NOTE: If you are using a different modem/router brand, simply adjust the subnets / addresses as necessary.
Since the router is by default using 192.168.1.254, we can configure the IPCop using ANY other address on the same subnet (since we know that there isn’t anything else using that subnet on our RED interface anyway). For simplicity’s sake, I will use 192.168.1.1 for the RED interface.
We are now going to create another session in putty to add the IP address 192.168.1.1 to the red interface for us automatically.
Start up putty again. Select the IPCop Console session, and press the LOAD
button. NOTE – we do NOT want to establish a session at this time.
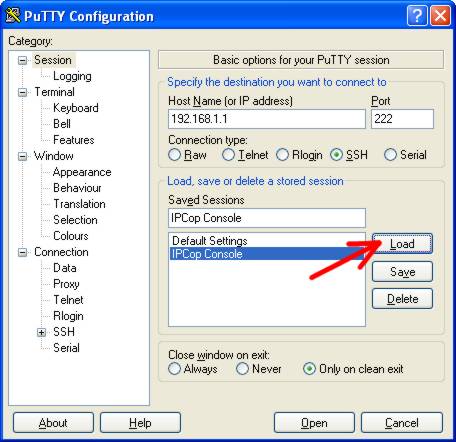
The settings for the IPCop Console connection will now be loaded in to putty. In the category list, expand ‘Connection’, and then select ‘SSH’. At the top of the page, you will see a field ‘Remote command’. This is where we will add the command that putty will execute for us.Type the text below in to the ‘Remote command’ field. Change 192.168.1.1 to whatever address you would need to use to talk to your brand of modem/router.
/sbin/ip addr add 192.168.1.1/24 dev eth1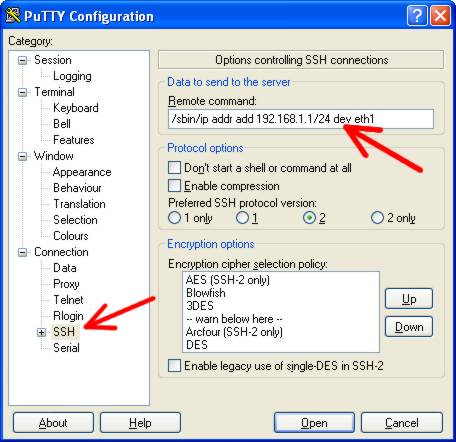
In the category list, click ‘Session’ at the top.
Now, under ‘Saved Sessions’, change the name of the session to something else.
In my case, I used ‘ADSL Router Access Start’. Below the ‘Saved Sessions’ field,
you will see an option ‘Close window on exit’. Set the option ‘only on clean
exit’ and then click the SAVE button. 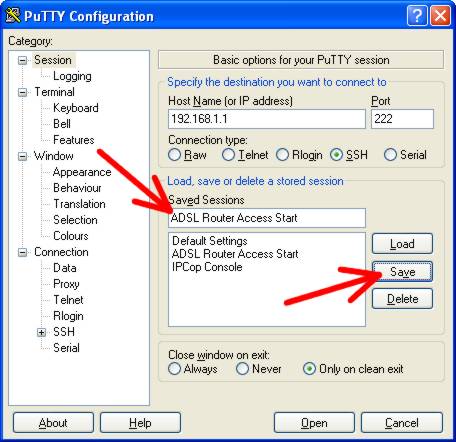
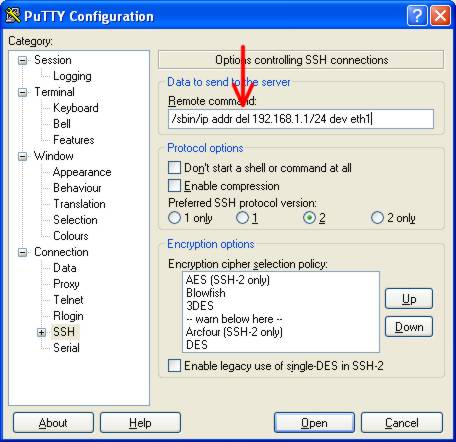
In the category list, select ‘Connections -> SSH’ again. In the remote command
field, change the word ‘add’ to ‘del’ so that the remote command looks like
this: /sbin/ip addr del 192.168.1.1/24 dev eth1
In the category list, click ‘Session’ at the top again, and change the field under ‘Saved Sessions’ to something else. I used ‘ADSL Router Access Stop’ and click the SAVE button.
Now you should have three sessions in your session list: IPCop Console, ADSL Router Access Start, and ADSL Router Access Stop.
We have one more session to create.
In the Saved Sessions list, select IPCop Console, and press the LOAD button.
In the category list at the left, select ‘Connection -> SSH’ again. This time we leave ‘Remote command’ blank, but now we need to set the option ‘Don’t start a shell or command at all’. Once you have selected that, in the category list, expand the ‘SSH’ node that is currently highlighted, and then select ‘Tunnels’.
We’re only concerned with the options near the bottom, Source Port, Destination,
etc.Enter a source port. This can be anything you like (up to 65535) – AS LONG
AS IT IS NOT IN USE ON YOUR COMPUTER.
If you want to see what ports are currently in use on your computer, open a
command prompt, and type netstat -an. You’re concerned with the column called
‘Local Address’, which will have a whole bunch of entries like 127.0.0.1:137 or
0.0.0.0:500, with various other addresses on your machine. The part that you’re
concerned with is the bit after the “:” – so x.x.x.x:400 <– that is the port. If
the port you want to use is listed here, you will need to choose something else
– as long as it doesn’t appear on that list. NOTE – on Vista you might need to
run the command prompt as an Administrator (Right click the shortcut).
In my case, I just used the port 12345. Enter the destination. This will be the modem/router IP address, and the web port. So I used 192.168.1.254:80(Port 80 is the port that web servers listen on).
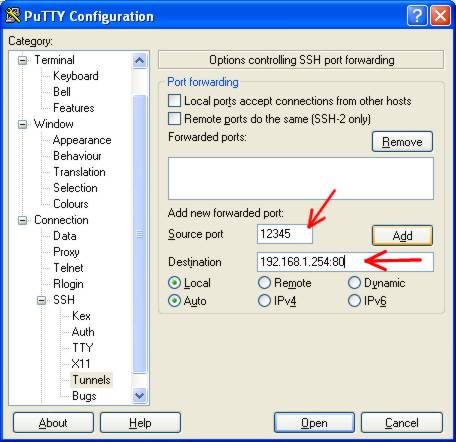
Click ‘ADD’.
In the box above that section (called Forwarded Ports), you will now see an entry:
L12345 192.168.1.254:80
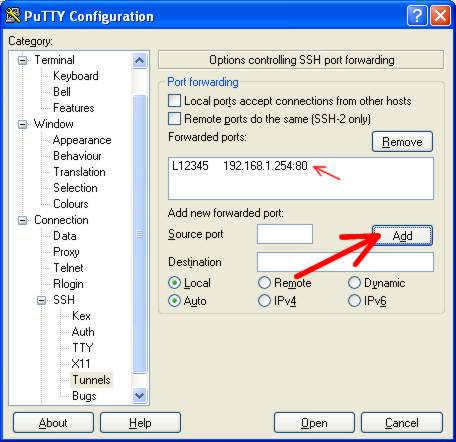
In the category list, click ‘Session’, and under ‘Saved Sessions’, give the session a new name. I used ‘ADSL Router Port Forward’ and click SAVE.
Congratulations. The configuration is now complete.
How to use it: Start Putty. Double click the ‘ADSL Router Access Start’ session. Enter the password. Almost immediately, the putty window will close. THIS IS NORMAL. All putty did was tell the IPCop to add the IP Address of 192.168.1.1 to the RED interface so that we can access the router.
If you run this command more than once, nothing bad will happen, so if you’re not sure if you ran it, you can safely launch it again.
Start Putty again. This time, double click the ‘ADSL Router Port Forward’. Enter the password, and then nothing much will happen. You will not get a command prompt, nor will anything further appear on the screen. DO NOT CLOSE THE WINDOW. Just minimize it to get it out the way.
Now open up your web browser, and enter the url: http://localhost:12345. You
should be prompted to enter your modem/router password. Congratulations, you are
now accessing the configuration pages for your modem/router.
When you are finished with the modem configuration, you can close the putty window that you opened previously. This will terminate the tunnel through your IPCop to your modem, and accessing localhost on port 12345 will no longer work.
While not entirely necessary, you can start putty, and launch the ‘ADSL Router Access Stop’ session, which will remove the 192.168.1.1 ip address off the RED interface.
View all of Access your router behind your Linux firewall
We run McAfee as our corporate antivirus software. It’s fairly nice to manage via ePolicy Orchestrator, and I haven’t really had any issues with it, apart from corrupt Framework agent files now and then etc. Until I rolled out VirusScan 8.5 + AntiSpyware.
We use several remote admin tools on our network, one of them being TightVNC. So, because of this, in the Unwanted Programs Policy, I disable the category to detect remote admin tools, thinking that our remote tools would be safe.
I roll out 8.5 to a few machines here and there for testing purposes. It’s been running on my entire department’s machines since the 21st December, and it has been running on about 7 additional test workstations scattered throughout the environment for the past two weeks with no issues.
So today is the big rollout day where we deploy 8.5 to the rest of the company.
The next thing, I notice that our monitoring workstation has a virus alert on the screen. I go take a look – and discover that McAfee has gleefully deleted Tight VNC – detecting it as RemAdm-TightVNC. Hmmm… RemAdm… Remote Admin perhaps? That category that was UNSELECTED for detection? Yep.
Since our monitoring workstation is set up in a really inconvenient place to work on it (hence the desire for VNC), I decided to try remotely execute a few commands in an attempt to solve the situation.
Oooh. Guess what – psexec is detected as RemAdm-PSKill.
What I find hilariously funny is that I have PSTools installed on my workstation – in my Windows directory for that matter, and I have been running McAfee VirusScan 8.5 for the past month with EXACTLY the same policy that is installed on our monitoring station, yet it has NOT picked it up. It also fails to pick up UltraVNC which I have installed on this workstation. Gotta love the selective detections.
So I add all those detections as specific exclusions in the Unwanted Programs Policy. Then I get to thinking, “What else is this fucking software going to detect and delete?”
To the knowledgebase, Batman!
I find an article referencing Antivirus 8.0i, explaining how to get a list of PuPs (Potentially Unwanted Programs) from a command line tool called csscan.exe. The article says to run csscan.exe /TARGET APPLIST >c:\applist.txt
I run it and view the resulting applist.txt.
CommonShell Command Line Scanner (VSCORE.13.3.1.100)
Engine Version : 5100.0194 AV DAT Version : 4947.0000 223716 detections Built Tuesday, January 23, 2007 Extra DAT : 0 detections
Summary :- FilesFound : 0 FilesScanned : 0 FilesNotScanned : 0
ObjectsFound : 0 ObjectsInfected : 0 ObjectsCleaned : 0 ObjectsDeleted : 0
FilesInfected : 0 FilesCleaned : 0 FilesMoved : 0 FilesDeleted : 0
Wow, quite a list. Well, I figure that since the article was applicable to 8.0i and not 8.5, they might have changed the command line a bit.
Indeed they had. Now there was a nifty parameter called PupList.
Please wait … retrieving list of names from the Anti-PUP DAT Detection name list retrieval failed
Fun fun. So I try all the other *List parameters, and discover that the only one that works is VirList, which helpfully lists most detections in the DAT files.
I also discovered that csscan.exe can be used to restore the backups that are made before files are deleted.
csscan.exe /BackupDir C:\Quarantine /RestoreBackup RemAdm-TightVNC
There’s quite a lot of nifty things that can be done with that csscan.exe. Pity it’s not documented somewhere useful. :p